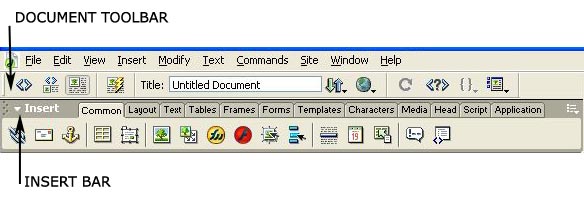
contains buttons and pop-up menus that provide different views of the Document window (such as Design view and Code view), various viewing options, and some common operations such as previewing in a browser.
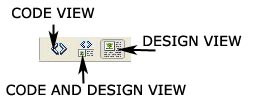
visual representation of the document, similar to what you would see viewing the page in a browser
a hand-coding environment for writing and editing HTML, JavaScript, server-language codesuch as Microsoft Active Server Pages (ASP) or ColdFusion Markup Languageand any other kind of code.
allows you to see both Code view and Design view for the same document in a single window.
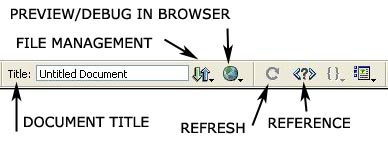
allows you to enter a title for your document, to be displayed in the browsers title bar.
displays the File Management pop-up menu.
allows you to preview or debug your document in a browser. Choose a browser from the pop-up menu. Use debug in browser if your code contains Javascripts.
displays the Reference panel.
refreshes the documents Design view after you make changes in Code view.
contains buttons for inserting various types of objects, such as images, tables, and layers, into a document. Each object is a piece of HTML code that allows you to set various attributes as you insert it. For example, you can insert an image by clicking the Image icon in the Insert bar. If you prefer, you can insert objects using the Insert menu instead of the Insert bar.

Click the expander arrow in the left corner of the Insert bars title bar.
Click a tab.

The Common tab in the Insert bar allows you to insert the most commonly used objects.
insert hypertext links at the insertion point, or immediately following the current selection.
places a named anchor (a name="") at the insertion point. A dialog box appears; enter a name for the anchor.
places a table at the insertion point.
creates a layer. Click the Layer button, then move the pointer to the Document window and drag to define the size and location of a layer. By default, Dreamweaver creates a layer defined by the div tag. Use the Property inspector to select a different tag, or change the default setting with Layer preferences.
inserts an image at the insertion point. A dialog box appears so that you can specify an image file.
NOTE: The ones included here are frequently used.

allows you to insert text- and paragraph-formatting tags.
displays the tag editor for the font tag, to allow you to set attributes before inserting the tag.
wrap the corresponding HTML text-formatting tags around the selection.
wrap the corresponding HTML block tags around the selection.
wrap the corresponding HTML heading tags around the selection.
wrap the corresponding HTML list tags around the selection.
wrap the corresponding HTML definition-list tags around the selection.
insert tags that allow you to specify full text for an abbreviation or acronym, for the potential benefit of search engines, screen readers, and so on.

allows you to insert table-related tags.
places a table at the insertion point. A dialog box allows you to specify table attributes, such as number of rows and number of columns.
each insert a pair of table-related tags (table, tr, th, td, or caption) at the insertion point.

contains buttons for creating common frameset layouts.
each create a frameset and add a narrow empty frame to one side of the current frame.
each create a frameset, add a narrow empty frame to the left or right of the current frame, and then add another empty frame below both frames.
each create a frameset, add a narrow empty frame below the current frame, and then add another empty frame to the left or right of both frames.
creates a frameset, adds a frame below the current frame, and adds another frame above both frames.
each create a frameset, add a narrow empty frame above the current frame, and then add another empty frame to the left or right of both frames.
each create a frameset, add a narrow empty frame to the left or right of the current frame, and then add another empty frame below both frames.

The Property inspector lets you examine and edit properties for the currently selected page element, such as text or an inserted object. You can select page elements in either Design view or Code view.
To show or hide the Property inspector, choose Window > Properties.
The contents of the Property inspector vary depending on the element selected. For information on specific properties, select an element in the Document window and then click the Help icon in the upper right corner of the Property inspector.
Source: Macromedia Dreamweaver Help File
For questions and comments send it to the Webmaster